Showing posts with label DIY Bride. Show all posts

Saturday, November 26, 2011

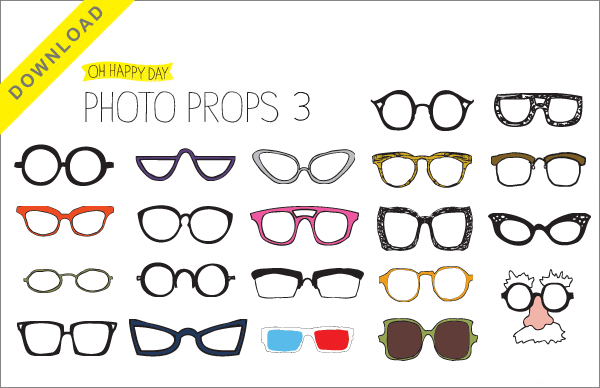
Free Printable: Photo Booth Props

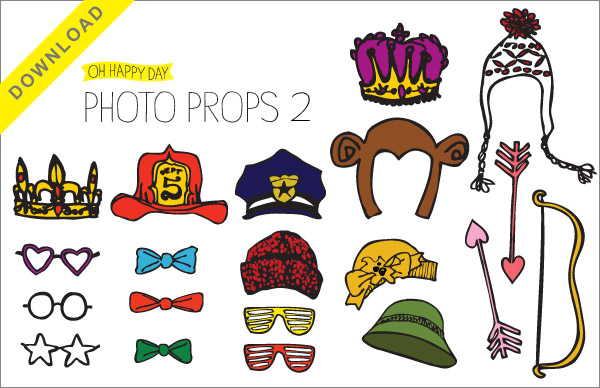
Oh happy day! Literally. I found the most adorable - FREE - do it yourself photo props over on the blog: Oh Happy Day. Mad props to them for putting these together but, it gets even better! They have an easy to follow DIY tutorial on how to make them! 


I downloaded them myself for future use - one can never have too many photo props sitting around, right? When I opened the first set I was thrilled to see that the images are actual size! Thank you so much to the fab group at Oh Happy Day for this awesome DIY project!

Wednesday, October 19, 2011

Tis the season...to BAKE!

Do you ever get that feeling that when the weather starts getting cooler you need to turn on your oven and get baking? Maybe it has something to do with all the holidays that come up between October and December. Baking just seems to be on my mind a lot lately. Seeing pictures like this does not help this baking bug I have:


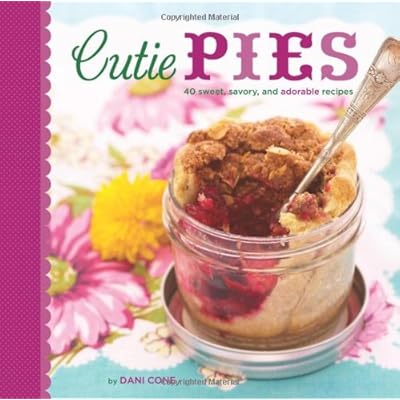
Looks yummy huh? I think seeing all the goodies and gadgets in the stores, now that they all have Christmas displays up months in advance, has something to do with my current baking obsession. I keep seeing all these new baking gadgets too and I REALLY want to try them! Those little mini pies above were made using the Breville Pie Maker, available exclusively through Williams Sonoma for $99.95 (ouch). But, I also saw a mini pie maker from Sunbeam - I think it made 5 mini pies for $29.99 at Target. I can't seem to find that one online though! And there are some books filled with mini pie recipes:


If mini pies aren't your thing, you can find a little gadget for every type of dessert! There are so many I would love to try but, finding storage space for all these gadgets could prove to be a problem...not to mention all the calories from these goodies...but they are mini right??


Babycakes also makes all kinds of plug and bake dessert gadgets. They have the Cake Pop Maker - you can bake 12 cake pops in just minutes, then add sticks and get creative with the icing and decorations:

CP-12

Another recent obsession: pie pops. Love them. And guess what? There's a gadget for that!
PM-16

And this one has to be my favorite: Whoopie Pie maker. I do like these little guys! Babycakes also includes ALL the things you need to make these little heavenly cakes:

WH-24

Are you in the mood to bake yet? Have you ever used any of these gadgets? I would really love some comments on this one! I have the mini cupcake maker and it's just ok. They are quick and fun to make and I am seriously considering purchasing these guys to add to the fun of my holiday baking!


Saturday, October 8, 2011

DIY Push Cakes

My friend tried her hand at making those popular push cakes last night. Do you remember ever eating the Nestle Push-Up ice creams? Well, they are still around but, now they have gone a step up! So, instead of ice cream you use plastic tubes and fill them with cake, frosting, sprinkles, then more cake, more frosting and more sprinkles. By the time you are done you have a tube filled with goodness. Can't go wrong there! 


1-Case, Push-Up Tubes For Ice Cream or Cakes (Includes 100 each Lids, Tubes, Bases and Sticks) - Click Image to Close
Where you can go wrong is trying to find the most important part: the tubes. My friend decided at the last minute to make these so she found the tubes at a local cake supply store. Mistake number 1. She paid $1.25 per tube and that just didn't seem like an economical treat for a party/shower or wedding - especially if you need to make like 50 of them! So, I did a little research and I found them priced pretty much the same on all sites (around $60 for 100 pops):

  • http://www.lagunawholesale.com - $61.12
  • http://pushpopcontainers.com  - $73.55
  • http://www.bakedeco.com - $67.21
Now, the question is: what do I use to fill them? Well, pretty much anything! I have heard of people doing it the easy way: buying the premade mini brownies at the grocery store, baking a cake and then crumbling the cake inside or my friend ended up using a mini muffin pan and baking her cake in that. The result was a perfect looking push cake! 

You can also use this "Handmade with love!" sticker I created:
Click here to download this file! It was made for MS Publisher and prints nicely on Avery 8293

Did you know that a package of Avery 8293 labels is part of our October "Meant To Bee" Giveaway? You could win this prize package - enter here!


Sunday, October 2, 2011

Meant To Bee - Cakes, Cupcakes, Push Cakes and more!

One of my favorite things about having a party is the cake! Wedding cake, birthday cake, any kind of cake! Thankfully, I have an amazing bakery that I love near me: Beverly's Best. I have blogged about them before (here, here and here!). I already knew how I wanted the cake decorated and it was pretty easy to go in there and order - and I got to pick up a little treat while I was there (it was an espresso cup made of chocolate and filled with a cappuccino mousse....heaven!!). The anticipation of seeing my idea come to life was killing me! I couldn't wait to pick up the cake and I can tell you, once again, I was not disappointed - with the design and later slicing into it - deeeeee-lish!!


Those little bee's buzzing around the cake?? They were not done at the bakery! Oh no, one of the first things I found on Etsy when we had decided on the theme were these little guys from Sweeten Your Day:

Mini Bumble Bee Cupcake/Cookie Toppers - 1 Dozen
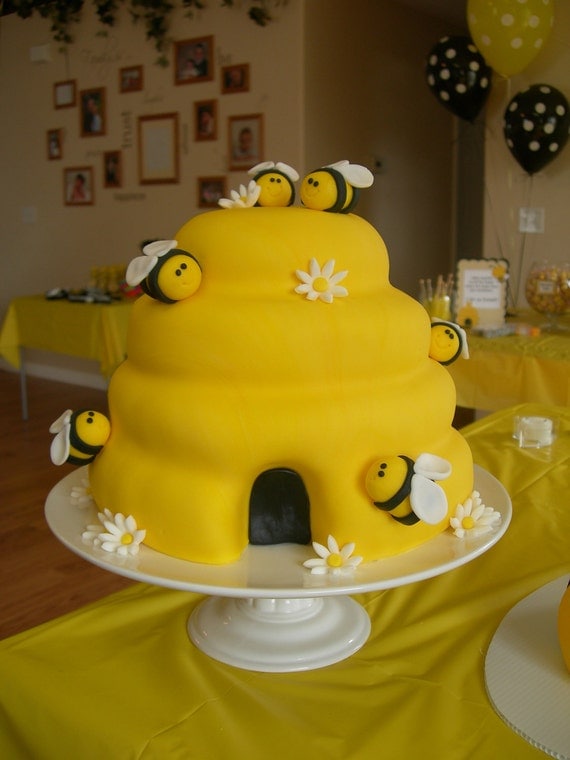
And then I saw this cake picture that featured a larger bee:
Mini Bumble Bee Cupcake/Cookie Toppers - 1 Dozen


Super cute, right? I ordered them right away! You can get a dozen mini bee's for $15.00 but, since I knew I wanted to use them on the cake, I split my order to 6 mini bee's and 6 large bee's. Jen is the owner and chief designer of Sweeten Your Day - she has been in the cake business for over 4 years but, decided to take a break to spend more time with her kiddos. You know when you love something though, it is a part of you, so she opened an Etsy store where she sells all kinds of cupcake and cake toppers that are ALL made by hand with either fondant, gumpaste, or royal icing and they are ALL 100% edible! Jen can custom create anything - so, no matter what your theme is she will work with you! I can tell you that when the bee's arrived they were packaged safe and secure and they looked exactly like the picture: PERFECT - right down to their little smiles! I loved them! For size purposes, you see the larger bee's on the cake above so, here is a picture of the mini bee's on the cupcakes:


Speaking of cupcakes...mmmm! I had purchased from one of those daily deal sites (like Groupon) a deal on a dozen push cakes from Kays Kupcakes. I knew I would be celebrating 2 different occasions so, I bought multiple deals to use. I love push cakes - they are cake and frosting in those little plastic tubes - heaven! So, when I called Kay to redeem my deal I explained to her my party theme and that I had already ordered a cake but wanted to do a sweets table. She was totally flexible (and super, super nice too) so, we came up with the idea to do 1 dozen push cakes and 1 dozen cupcakes. This was perfect since I needed to use my little mini bee's! Then, towards the end of our conversation, on a whim, I asked her if she did cake pop's! YEP! She did (pricing was excellent too!) so I ordered 2 dozen cake pop's from her as well! When we finally met in person, we hit it off perfectly! She is so sweet and bubbly - she fits right into the cupcake world! Speaking of the cupcake world, Kays Kupcakes hosted Cupcake Camp OC this year. Cupcake Camp OC is a gathering of cupcake-lovers to raise money for a good cause. This annual event is 100% volunteer-organized and operated by Kay and Tiffany.


So, the most important thing about cupcakes, push cakes and cake pops are how did they taste, right?? Well, I can tell you Kays Kupcakes has gained a permanent FAN in me! The frosting was incredible, the cake super moist and yummy flavor and the cake pops - amazing! I have had quite a few cake pops - even tried to make them myself ONCE - and they are not easy! Kays Kupcakes, on the other hand, has it down!! (just a little shout out here: THANK YOU SO MUCH Kay! I am so glad I met you...I am a huge fan!). So, no matter where you are, the push cake and cake pops can be delivered so keep them in mind for your next party, you won't be disappointed!


Now that I had my cake pops ordered, my next task was to find something to display them! I headed back over to my favorite hand made community, Etsy, and began my search. It didn't take me long to find MCreations4u. A relatively new shop on Etsy but, their prices were great and their feedback was good. I sent a message over to Marilou and she responded within an hour! I had explained my theme and she got back to me that same day with 2 mock up's of what I wanted - this was the one I chose: 


WOW. Talk about customer service! I was super impressed! I ordered the same day! 4 days later, I had my custom, handmade cake pop stand! I thought I was impressed before?? Double WOW now! The quality of this stand is super, duper amazing. I could not believe it! I was so excited about this and honestly...I already have ideas for two more I want to order now! Cake pops are really popular little desserts right now and if you have been looking for a way to show them off - or if you make them as part of your bakery - I urge you to check out Marilou's shop. Marilou can make whatever theme you are going with and you can message her about custom colors. You will not be disappointed with your purchase or her excellent customer service - I guarantee it!


Now, finally the candy bar! This was something I was planning on from the beginning but, something I waited to the last minute to put together! I couldn't decide if I wanted to hire someone to do it or make it another DIY project. I had been hunting for containers but, then decided if I factored in the cost of the candy and all the containers (which I would NOT need after) the price would work out to be very close. Decision over - hire a candy bar company. WRONG. I wasn't able to find anyone available to do it! Slight panic mode was setting in. I searched out a few online wholesale candy companies. I knew I had to find someone local because the party was only 4 days away! Luckily, I live in Southern California and I found a couple of options. I visited Candy Pros, located in the San Diego area, and when I checked the shipping information it said if you needed the order right away to call them because processing the order could take up to 2 days (yikes). I called and spoke with Susan and she told me, "If you place your order online within the next 10 minutes I will be able to ship it out today." Lady luck was on my side again! UPS Ground shipping would take 1 day. I ordered 15 pounds of candy and 12 Whirly Pop suckers - their prices were the best I found online but, their customer service plus same day shipping without any up charge equals a BIG WIN in my book! I would also like to share a discount code with all my readers for Candy Pros! I got such a wonderful email from Candy Pros the other day and guess what?? They have offered to give anyone who orders an ADDITIONAL discount off their already low prices! Yay! If you place an order with them, use the code “meanttobee” at checkout for an additional 5% off! If you are considering doing a candy bar or need any sweets - this is the site to check out! My order was packaged with care (meaning with candy lots of shipping popcorn and even had the ice packs to ensure no melting). In addition to their easy to navigate webpage you can find their blog here - which offers lots of ideas!


The only issue left was finding containers and scoops! Party City solved that problem. While picking up a few last minute items, sitting right at the check out counter display were these clear candy bar container kits from Wilton. They were priced at $9.99 for the set of 3 and the kit also had the labels you see on each container in the photo above. Surprise, surprise! They also had the candy scoops! The scoops would work but, they did have hearts on the end and I would have preferred no hearts. I ended up not buying the scoops - I had one more place to try but, at least I knew they were there if I couldn't find what I was looking for. By this time, it is the night before the party I had one more stop - Cost Plus World Market. If you are lucky enough to have one of these stores near you (they have 258 stores nationwide) you will be able to find the perfect 3-piece aluminum scoop set for just $4.99!


I hope you have enjoyed my Meant To Bee recap! I also hope that out of the two posts that if you are planning a Meant To Bee party, shower or wedding theme that the DIY projects I have listed and the vendors I have recommended will come in handy for you! Now, it's time to announce our Meant To Bee giveaway!!


Like all the things you've seen in this post? You can win these items! Our Meant To Bee Giveaway is now open! 

Click here to enter now!


Thursday, September 29, 2011

Meant To Bee - Invitations and Paper Goods

I thought we should start off with the first thing you need to send out when you are planning a party - the invitations. Your invites will be the first insight your guests have to the type of party you are planning and what theme you are going with. All of your paper goods will also coincide with the invites. As I have stated (numerous times) I consider myself "craft challenged" and my instinct is to head straight to Etsy to find the real "pros". I had someone in mind to do my invites and paper goods but, I found myself 14 days out from the party (not good advice and please do not follow my lead on this!) without a confirmed order. I was close to panic mode and knew I had to get the invitations done so, I ventured into what I consider a foreign country - Michael's Craft Store. I found some A7 card stock with envelopes, a 4x6 white card stock and some little wooden bee self-adhesive stickers. 


I have a program called PrintingPress from Moutain Cow that I bought years ago - a good investment at $29.99 since I have been using it for many years now! It makes printing invitations, RSVP cards, envelopes and more super easy!


I knew there would be certain paper goods I would need: stickers, banners, table tent cards, decorative cupcake sticks and address labels. The stickers and the address labels proved to be the easiest out of the bunch! I have used these labels (the same boxes mind you!) for years and multiple projects! I have perfected the round label using MS Publisher! I used the round labels to print the invitation envelope seals and stickers used on the push cake pops. I changed the sticker up, a bit, for this post. But, this can be used to seal the envelopes to the party (before, during and after!) or to seal a favor bag or box. There are so many uses! This is what it will look like:


This file was created using MS Publisher - if you use any other program you may need to change a few things to tweak it. This can also be reinvented for so many other needs like changing the text to say - SAVE THE DATE and then add your date underneath or change the words to "THANK YOU" to use on favors! CLICK HERE TO DOWNLOAD THE BEE STICKER
*Should be used with Avery 8293 labels


One of the next projects was creating table tent cards. These are pretty easy to make. Simply print out on heavy stock paper and then cut into four. I actually used a heavy photo paper I had (to give them a shiny look) but, card stock will also work. I then used some ribbon I had to go with the theme and used a little bit of gorilla glue. Boy, that glue really could work on a gorilla...it's amazing! You can download the template for the table tent cards here. Simply change the text to work for your party - these can also be used for seating cards or escort cards! I do all my work in MS Publisher - if you use another program you may have to adjust the specs.


Cupcake topper or party sticks can be used for a variety of goodies. These were fairly easy to make - the hard part was finding the right size puncher to use! I think checking online would be a better way to go because, honestly the selection at craft stores  near me was somewhat limited! They had a lot of them...just not the perfect size or shape. My first purchase was for a scalloped 2 inch circle - that just did not work though! It just seemed too small once you punched them out. I then purchased a 2.5 inch round circle punch. I bought some fun scrapbook paper at Michael's ($0.69 per sheet). I used the 2.5 inch puncher to get the polka dot circle, printed out the smaller decorative circles on photo paper and just used some household scissors to trim and of course some 6 inch lollipop sticks. The lollipop sticks were $4.99 for 100 sticks! My gorilla glue came in handy once again to assemble. These were fun to do and I plan on using this idea for some other upcoming parties. You can download this image to use for the smaller circle - just add text or image you want to use. You can also use your photo editing software to change the color of the circles!
One of my craft friends, she is in the "pro crafter" category, made the Happy Birthday banner for me. She has all the fancy gadgets, like the Cricut, which would have made a lot of my DIY projects easy! I couldn't see investing that kind of money into my own projects although, I do think that it would be fun to own one to see what I could come up with! Bee Creative, my friends business, has all kinds of banners, invitations and well, pretty much anything you can think up - she can do!


This finally wraps up my post on the invitations and paper goods! I hope all the files I uploaded will help you with your crafts projects! And if you are on Facebook, head on over to Bee Creative and "like" them! Now, let's talk about one of my favorite things: the sweets!!

Our Meant To Bee Giveaway is now open! 
Click here to enter now!


Tip Junkie handmade projects


Tuesday, September 27, 2011

Busy as a bee!

I have been a little quiet on the blog lately but, not without good reason! I have been working feverishly to plan my daughters 5th birthday. Without a doubt, any party planning always makes me think about weddings - because a wedding, engagement shower or bridal shower are simply parties. They are celebrations where you have a lot of people coming together and they inevitably cost a lot of money. One of my goals with the blog is to show you how to save money on your wedding - or any celebration you are having! My daughter finally chose her birthday theme: Bumble Bee and my wedding brain kept telling me "Meant To Bee" with every detail I was planning. Because there is SO much information and detail to share, I am going to break it down into a couple of posts so, bear with me, because at the end you, my faithful readers, will be rewarded for buzzing a long with me on this journey! I will provide you with all these great things to make your event and planning MUCH easier:

  • Tutorials - how to make all the DIY items
  • Templates - blank templates for you to use
  • Vendor tips and reviews
And...finally, you will be rewarded with a giveaway! I have an amazing giveaway planned for you! Please share this blog or these posts with your family and friends: anyone planning a party or a wedding - especially if you feel it is meant to bee!


Wednesday, August 3, 2011

Mini Cakes

One of the featured vendors for the Aqua Blue and Red inspiration was Carrie's Cakes. This bakery, located in Sandy, UT, is the owned and operated by...you guessed it: Carrie! She has been making cakes for over 30 years and I can tell you, it really makes a difference when you have that much experience behind you! An idea I toyed around with when I was planning my own wedding (6 years ago) was having mini cakes - but, they were pretty much non-existent then.

Carrie has a whole section of her website dedicated to these delightful mini works of art! She has perfected the use of fondant - she has her own secret recipe and if you have ever tried working with fondant you will know what a huge undertaking this is.
One of the best things about mini cakes is that you can have all different kinds of cakes - different shapes, sizes and flavors! 

The other reason I wanted to share about Carrie's Cakes is because she seems FUN! I looked at all her incredible cakes and I read her blog. She offers cake classes and has a store on her website where you can purchase tools if you want to try your hand at cake making - even DVD tutorials! But, the thing that really put her personality in perspective was this video:


Wedding cake delivery on a scooter! from David Perry on Vimeo.

Kudos to you Carrie! I loved watching this video because, seriously - when have you ever seen something like this? Love the polka dot helmet, love the awesome pink scooter and love the CakeSafe delivery box! This is just awesome - I wish I was in Utah so I could meet her in person (and order a mini cake!).

Monday, August 1, 2011

Red, White and Black Wedding Inspiration

It's the beginning of a new month! This summer has been flying by! I continue to be amazed by the enormous talent of artists who hand make gorgeous details for your wedding or bridal shower! Today was inspired by seeing these gorgeous red poppies:
Image of Modern Poppies Cake
They are actually sugar flowers made by Two Sugar Babies. You can dress up any plain cake with their amazing creations and voila! You have a work of art! Two Sugar Babies  makes cookie toppers, cake pop decorations, and even brownie toppers! Their creations even coordinate with social stationary designed by Kelly Lyden of WHHostess. 


So, finding the poppies led me on an adventure of red, white and black! I fell in love with this sassy feather fascinator (veil is not included in the price but can be purchased individually) paired it with bridesmaid dress style 7104 from Bonny Bridal (about $165 suggested retail price) and then found these adorable peep toe pumps! The price is AMAZING - only $39.99 and free shipping from Your Shoe Store. Lastly, I headed back to Etsy for one more look around for wedding items in my color theme. Luckily for me (and you) I found these handmade paper flowers. The price is awesome: $3.75 for 25 flowers. These flowers gave me all kinds of ideas! They are small (approx. 5/8 in diameter). My mind started racing with all the things these dainty flowers could embellish for your wedding and DIY projects: invitations, placecards, will-you-be-my bridesmaid cards and so much more! Are you using Red, White and Black as your wedding colors? If so, share any of your amazing finds!


Sunday, July 24, 2011

Cheery Cherry Wedding Inspiration

Cheery, cherry wedding inspiration! I am a fan of consumable wedding favors which is why I think having a candy bar or dessert station is a great additional to a wedding! Not only do these dessert tables help in setting the tone for your wedding, they also provide a great memory for your guests! While the vows and the meaning of the wedding are super important to you, having a great time at the wedding is important to your guests! So, on this super nice summer day my thoughts were of cherries! 

Cherry Sugar Cookies from JustCrumbs
 My hubby would go ga-ga for these mini cherry pies
 My favorite baker, Bakerella, made these - but she got the recipe from NotMartha

 Uh oh! I see a serious sidetrack issue going on with these mini-jars! Again this post is from Not Martha (another side track issue). I have just found two new obsessions interests!

I found a great website that has different size jars to use here!